


In 2023, 3D graphics is more than just a trend. 3D experiences are wanted in many creative spheres like gaming, animation, web design, etc. Brands compete to incorporate 3D models in their growth strategies faster, making the modeling and application market grow.
At Uni, we create immersive, emotional, and magical experiences that impact lives. Our tailored solutions will impress your customers.
Subscribe to our newsletter to learn the latest 3D graphic trends.
In this article, we reveal the process of creating Three.js materials, as we use it as a main tool at Uni. Our choice is unsurprising, as Three.js is a powerful cross-browser JavaScript library and API. It helps to create and display animated 3D computer graphics using WebGL in a web browser.
Why You Should Choose Three.js For Your Projects?
In Three.js, you can cover your objects with textures and materials. Moreover, the application offers a variety of custom shaders, sophisticated post-processing effects, and light sources to accentuate your picture. After work finished, import the items from the 3D modeling program into your product. Have questions? So, let's take a closer look at the materials and how to create them for Three.js.
What Is a Texture?
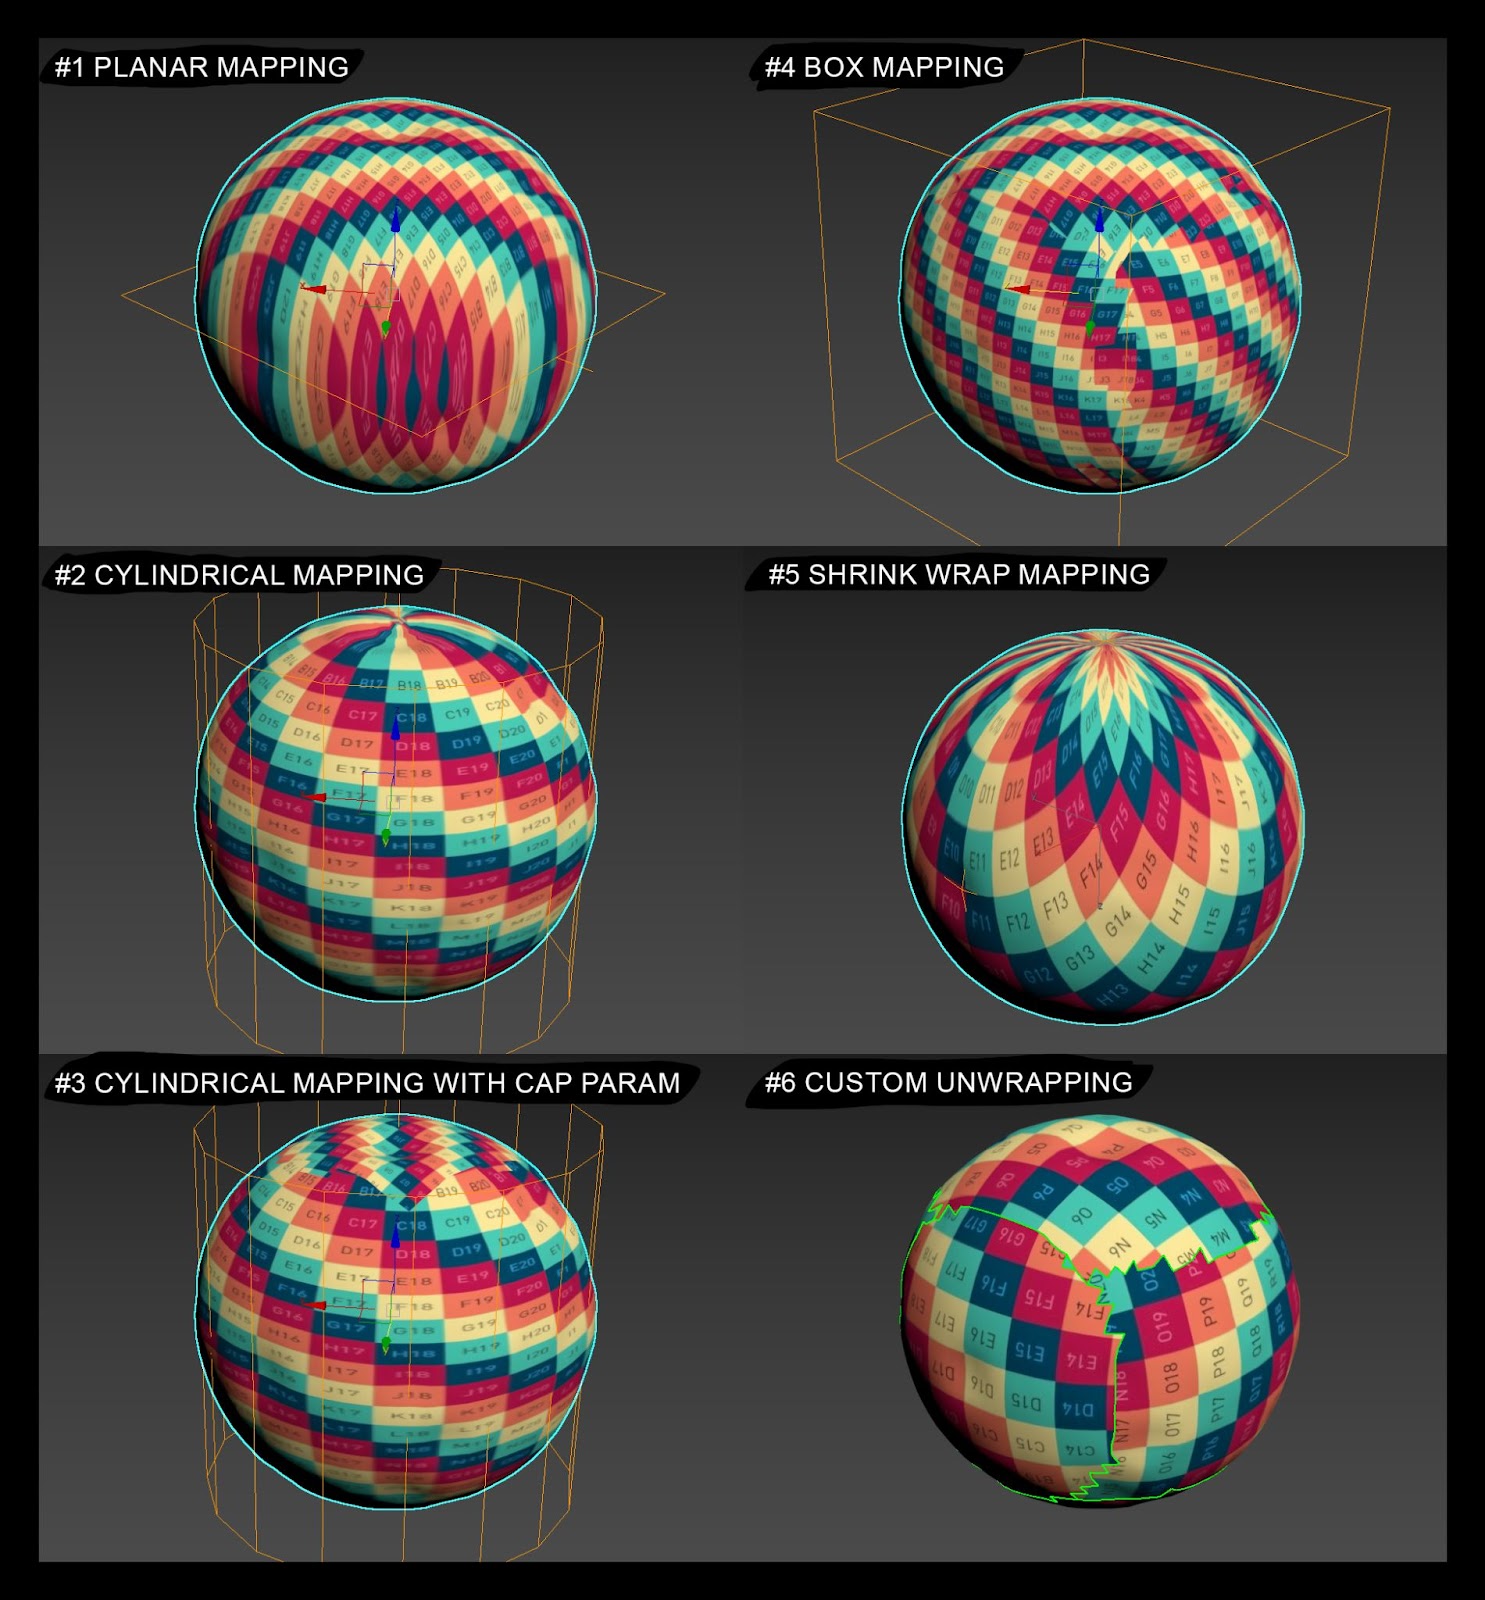
The texture is a 2D image projected onto or wrapped around a bare 3D model. You can opt for many projections like cubic, spherical, cylindrical, and planar projection, as well as their variations.On the contrary, do not apply automatic projections, as they lead to artifacts. The texture might tighten at poles, on faces, or polygons.
Furthermore, depending on the project's technical specifications, the textures can be layered to form a composite material. Usually, such a material needs three textures at least:
- a base color texture, also known as diffuse,
- a normal map,
- metallic and roughness textures.
Some studios recommend specular texture instead of roughness texture in their pipelines. Don't be confused: the specular texture is simply an inverted roughness.
The Image And the Texture. What Is the Difference?
In computer graphics literature, the terminology 'texture' and 'picture' often go hand in hand. It's better to distinguish them properly because they are often confused. They have much in common, namely, they have identical file extensions, such as JPG or PNG. So what makes them different?
First, a 2D image is mostly intended for human eyes. A texture, instead, contains data for graphic editors rather than is an pleasant image. If you open a texture in a viewer, you won't understand what it's about. At the same time, if you apply this file to a 3D model, the texture will add material to Three.js. scene.
.png)
.png)
The Most Commonly Used Textures in 2023
There are piles of textures in Three.js. Here is for you a list of the most popular textures among 3D designers:
- A base color/diffuse map is a color texture. Sometimes, ambient occlusion is also baked into it. Often, this is a base texture.
- A normal map is a detailed texture, also colored. It exists in three coordinates (x y z), corresponding to the Red, Green, Blue color scheme. Altering the heights in the coordinates, you can manipulate them in 3D space without physically changing the vertices in the model. This texture is often baked with details from a high-detailed model to a low poly one. Besides, normal maps can also interact with lighting.
- A roughness/specular map adds roughness texture. This black and white (b/w) texture represents how matte or glossy an object is. It often combines with other b/w textures, including metallic and ambient occlusion.
- A metallic map is a texture that indicates whether a material can conduct current. This texture is also black and white. It's not obligatory in some cases. For instance, when you create textures for brick or stone, being dielectric.
- An ambient occlusion map is a shading texture. It's applied optionally according to the optimization degree or author's style. In particular, it can be part of a base color/diffuse map or completely absent.
- A Metallic Roughness Ambient Occlusion map (MRAO) may include the previous three textures. It's a composite map with each texture on a separate red/green/blue channel.
- An opacity map is a transparency texture. It can be part of a base color texture like an ambient occlusion map. In this case, t a base color texture should support an alpha channel or act as a separate map.
- A bump map simulates bumps and wrinkles on the surface of an object. It's a predecessor of a normal map. The pixels in a bump map can be turned up or down to form the relief.
- A height/displacement map is a b/w texture based on the mesh substruction and extrusion. But unlike the previous texture, it involves altering the heights of the geometry vertices. IA height map occurs most often when creating landscapes. It is usually used in a 16-bit color range since compression artifacts are likely to appear on the geometry with 8-bit.
- An emissive map is a color texture used for glow effects. Blacks on the texture do not change, while colors will radiate like a light bulb.
As you can see, a map, or even a texture map, is another popular name for a texture. Technically, it's wrong, albeit it is most often used when adding a texture to a Three.js material.
When Does a Texture Become a Material?
A material is a set of textures, numbers, graphs, and other auxiliary elements to form a shader. Materials affect how we see volumes, curves, and meshes on a 3D model. They specify the object's color, texture, and interaction with light, for example directionallight.
At that, the material does not necessarily wrap the 3D model. For example, a material can be applied as a camera effect in the post-processing stage. It will pixelate the final image or add aberration effects. Well, the combination of effects is unlimited.
In this article, we consider only materials related to 3D models, where simple materials are represented as simple numerical values. At the same time, complex Three.js materials include textures, constants, masks, or even separate shaders that can be part of the mutual shader.
Materials In Blender
In 2023, Blender is the most effective solution for web-oriented 3D graphics since it's best integrated for Gltf/Glb format. Moreover, it works brilliantly for simple materials, morphing animations, keyframes, and skeletal systems.
By contrast, 3ds max gets improvements with a high pace, but still, it's not working with web animations. This flaw makes Blender a better choice for several upcoming years.
But let's go back to materials.
Versatile Shaders
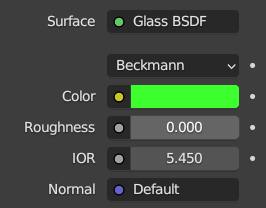
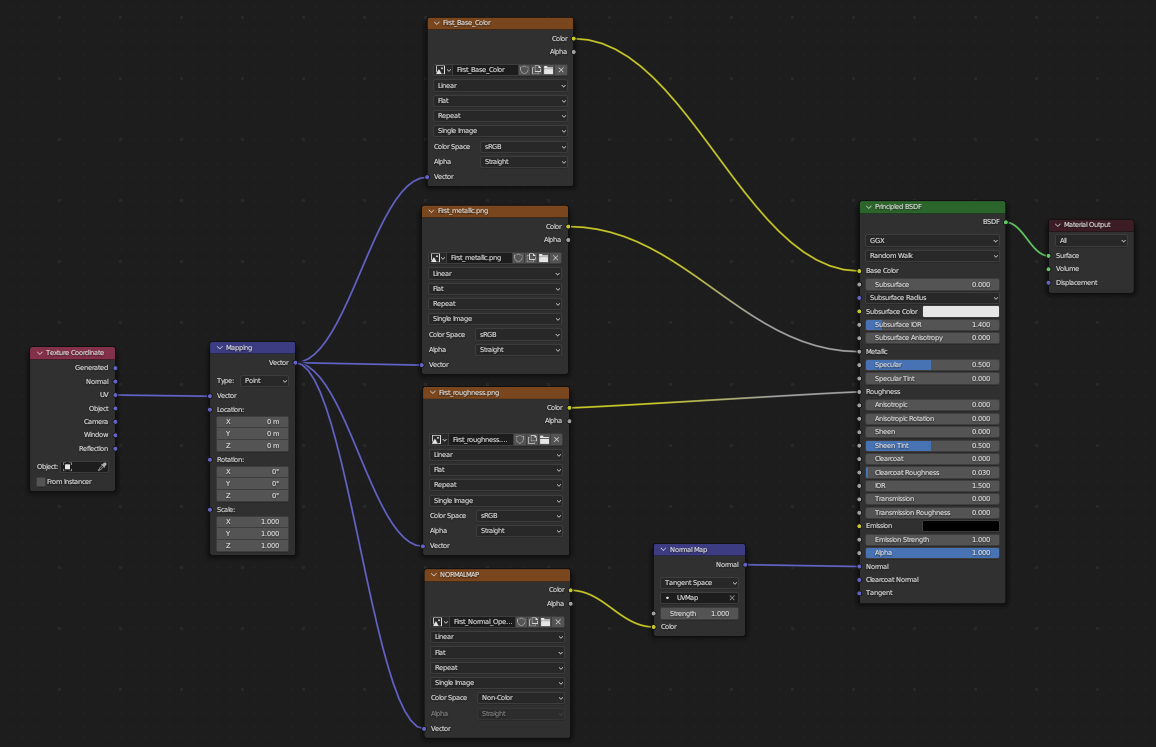
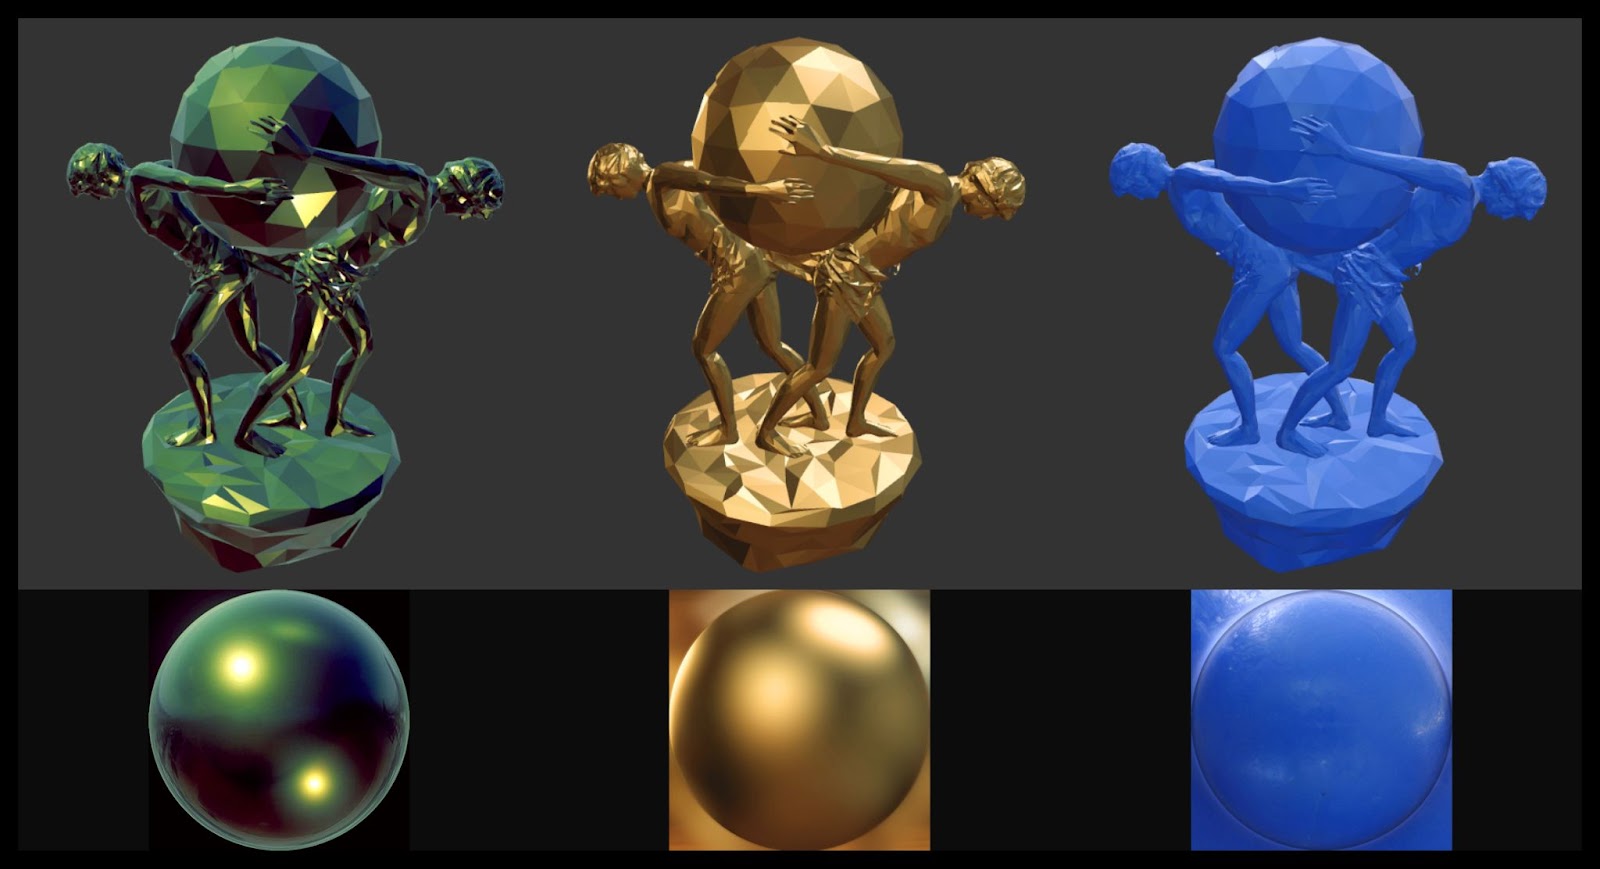
Blender has numerous shaders for various formats. For example, shader materials may be used separately. Glass BSDF, if you have a separate glass element. It's more convenient than complex Principled BSDF material. Glass BSDF alters the material's color, whether matte/glossy, refraction degree, or a normal map.
Default Materials
However, any material downloaded to the web, namely the shader, is automatically converted into a default material. This happens because almost all the parameters in these shaders are part of complex Principled BSDF material. This type is the default Three.js material, while Blender's
Principled BSDF material has a node with twenty-five inputs. We don't need all these inputs for web materials in most cases. Instead, we use default settings for these inputs.
As we have already said, Base Color, Metallic, Roughness, Emission, Alpha, and Normal inputs are among the most often used.
Blender Material Peculiarities
Yet, Three.js conceals some unpleasant surprises.
If we want to make the same repetition, tiling, once for all textures, for example, we need to tile the normal map several times, then Three.js unpredictably interprets such material, tiling the normal map as the other textures. So you need to fix it with code.
The second point worth knowing is that the material uses separate textures for metallic and roughness. While exporting to gltf/glb format, Blender will convert your textures into one mrao texture to optimize the file size.
The third important nuance you should know is that some properties of Three.js materials overcome the textures of the material.
The color, roughness, and metalness parameters are the source of repetitive misunderstandings between a 3D artist and a developer. With textures, we control the object's metallization, gloss, and color. From that point of view, color acts as a lens tinting the texture like a color lens filter in photography does.
Overall, Blender creates marvelous custom materials for Three.js; however, it cannot add baked light and occluded ambient onto the material. If materials have such nodes, it will greatly accelerate the developer's accomplishments.
Three.js Editor Overview
We have dove into the different materials and textures. Now, in Three.js, get all materials done.
At this moment, you have the models. You made them in Blender or downloaded them from any marketplace - it doesn't matter in our case. Then, you set up the materials and baked ambient occlusion. From this time, Three.js enters the scene.
In our opinion, the interface and features of Three.js are limited and somewhat obsolete. For instance, its nearest web counterpart, Babylon.js, is constantly developing for 3D graphics.
Notwithstanding all limitations, Three.js is the most flexible and powerful 3D engine for web browsers nowadays. The good tandem of a 3D artist and developer can create anything, from basic 3D models to realistic, photorealistic settings. However, there are tips you’d like to know before you get down to work.
Before You Start
First of all, disable autosaves. Otherwise, the editor may freeze every few seconds.
Next, there is no lighting on the stage by default. In the Environment tab, select which hdri type you use. I don't like choosing from the modelviewer line because the image is heavily overexposed. It is better to select the required parameter and load custom hdri.
After this, you can upload your model. Dragndrop works here fine, too.
Additionally, you can export your entire scene into glb format. When collaborating with developers, it is very convenient to demonstrate how your model/scene should look with the configured parameters in Three.js.
Furthermore, with the left click, of your mouse you can rotate the camera view; with the right click, you can move the camera view to the left/right/up and down. The scroll button will help to scale the screen.
Mesh Materials Three.js
Currently, Three.js offers 12 materials. However, the most commonly used are only four of them:
- MeshBasicMaterial
- MeshStandardMaterial
- MeshPhysicalMaterial
- MeshPhongMaterial.
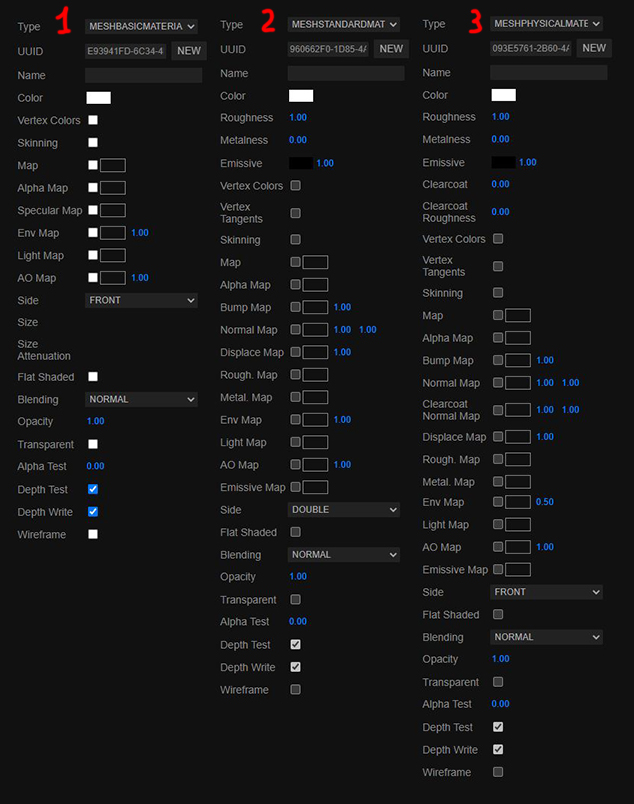
MeshBasicMaterial
MeshBasicMaterial consists of baked light and textures, so it doesn't require additional static or dynamic lighting in the editor. The light, ambient occlusion, and glare are already baked into the material's base color/diffuse texture (map). Let's go into its properties deeper:
- The color parameter is white by default. At its core, it is a lens through which we can see our material. It changes material color Three.js. If we use black value, our material will become completely black and the main texture will take on shades of blue if we add blue.
- An alpha map alters the transparency. The texture is black and white.
- A specular black and white map, where whites give a maximum reflection, and blacks do not let reflect anything at all.
- An environment map gives the reflections from the scene. For instance, if we use a sunset photo, the model will reflect this sunset.
- An ambient occlusion map gives shades. For this, generate a second UV channel on the model with the shading texture in the texture red channel.
- A side and the front-back double dropdown list indicates which side the geometry will face.
- The Blending scroll indicates how transparency will work: intersect, multiply, subtract, etc.
- Opacity with a parameter from 0 to 1 shows the transparency value, meaning 0 - transparent materials and 1 - opaque materials.
- Transparent and the true-false value. The true value corresponds to opacity gradations, and the false value makes the model visible or invisible.
- An alpha test values from 0 to 1. It influences how pixels will be subtracted/added. In practice, it goes well with foliage and fine detail.
- A depth test is a technical parameter, and it is better to leave it by default.
- A depth write controls where the transparency is displayed, on top of everything or not.
- Wireframe displays or hides mesh.
MeshStandardMaterial
The material properties in Three.js resemble each other with several distinctions. Let's look at them closer:
- Roughness material roughness. A value from 0 to 1, where 0 is perfectly glossy, 1 is maximally matte. It works through textures.
- Metalness values from 0 to 1, where 0 is dielectric, 1 is electric. Like the previous parameter, it works through textures, too.
- Emissive is the luminescence parameter. This parameter Three.js material mask is used to add glowing effects to objects.
- A Bump map is a black-and-white texture, allowing you to add a slight relief using texture. You can set the value from 0 to 1, thereby increasing or decreasing the influence of the bump texture. Do not overvalue it, as it may leave texture artifacts at high values.
- A normal map is the same as a bump one but is colored in purple tones. That's why it is more variable.
- A displace map works as the bump parameter. Unlike the previous two parameters influenced flat space, within their UVs, the displace map physically changes the geometry at the vertex level.
MeshPhysicalMaterial
Almost all MeshPhysicalMaterial parameters are identical to MeshBasicMaterial, except the clearcoat function. It imitates another material under the main one, for example, car paint.
Besides, you must know one more Three.js peculiarity. When you load a texture into a material, flip it vertically before loading the texture. It will help to load the texture vertically in most cases. This tip is not obvious, it’s not in the Three.js tutorial, but all assets entering the code are flipped by y by default. At the same time, Blender textures with material onto the 3D model will be displayed correctly.
MeshPhongMaterial
MeshPhongMaterial is a bright surface material with specular highlights. It received its name after after Blinn-Phong model which is used to compute the reflectance. This material may imitate complexThree.js materials such as varnished wood. You can use it instead of MeshStandardMaterial or MeshPhysicalMaterial. The performance will only improve, since it’s more graphically accurate.
Matcap Shader
Material Capture is a feature worth mentioning. It stores information for the engine to fill color, highlights, light, and shade. Then, all this information is projected onto the geometry of the model.
It is worth noting that this is not a Physics-Based Rendering material (PBR) material; you don't have to light the scene to render this material.
Wrapping up
Today's article delves into the enthralling realm of Three.js materials, examining the workflow in two stages in Blender and Three.js. The correct preparation has a significant influence on your 3D scenery.
Furthermore, we’ve talked about the most popular materials. For example, the MeshBasicMaterial , due its plainness, allows users to feel creative with attributes such as color, opacity, and wireframe. The MeshStandardMaterial, on the other hand, shines as a powerhouse like roughness, metalness, emissive effects, and more. It encourages you to imitate real-world surfaces and lighting interactions, resulting in convincing graphics that lure users into immersive experiences.
Understanding the powers and limitations of these materials wizards turn ideas into visual wonders. Whether you're an artist, developer, or hobbyist, mastering these materials is a step toward endowing your 3D vision with exceptional realism and inventiveness.
From our side, Uni, as an agency with top-notch experts in 3D web graphics, is always eager to assist you in your creative journey.
Follow us on social media for daily updates, expert tips, and a community of innovators. Join the conversation now!

.svg)
.svg)

.svg)
.svg)
.svg)
